
|
By Lyn Lomasi, Write W.A.V.E. Media Staff 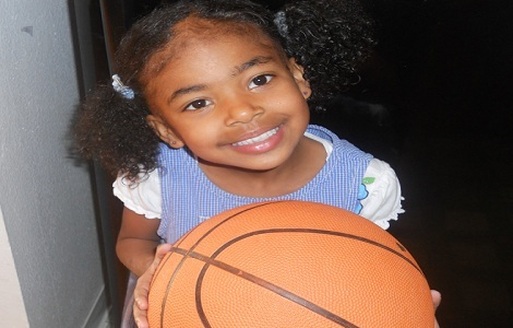 "Swish!" Was that Kobe? Not this time. That's the sound of your son or daughter making a shot from the bed. You've got the over-the-door setup covered. But she wants more items to show off her favorite sport. You can create a fun basketball themed bedroom for your child without going too commercial or spending too much cash. Go homemade with this simple DIY basketball bedroom décor for kids.
Easy No-Sew Basketball Throw Pillows To make some simple basketball throw pillows, you'll need orange fleece, black piping, fabric glue, and filler material. How much material you need will depend on how big or small you want the pillows and how many you will be making. Basically, look at the fabric and imagine cutting out two circles per pillow that are slightly wider than your desired size. Take those two circles and glue them together just around the edges outside in. Leave a small opening to put the filler into. Once the glue is dry, turn the material inside out. Fill it with the material to the desire fullness. Now fold the open edges down and glue them together to line up with the already-glued edges. Once that's dry, take your piping and cut in appropriate lengths to glue basketball stripes on the outside of the pillow. Let those dry and you're done. Hanging Basketball Lanterns For these, simply purchase the desired number of round paper lanterns in orange. You'll also need some heat-safe black paint. Hobby paint used for model cars works great for this type of project because it can be purchased in very small amounts or large containers. This way you only need to buy what you need. Take a paintbrush and paint the stripes onto the lanterns to make them look like a basketball. Basketball Scoreboard To create a basketball scoreboard, you'll need a chalkboard in the desired size, some chalk, white acrylic paint, and a paintbrush. Paint the scoreboard template onto the chalkboard and let it dry. Now whenever the kids shoot hoops on the over-the-door net or with paper balls into the trash can, they can use the chalk to keep score. Basketball Wall Décor For wall décor, collect any odds and ends related to basketball and frame them. This could be tickets, hats, jerseys, deflated basketballs, and more. Frame each item separately and hang them all around the room. Make it like your child's personal hall of fame if he or she plays the sport. If not, just make it about the game, in general. Basketball Bed Post Décor Want to create a basketball bed for your child that doesn't cost you a fortune? You can use your child's bed posts and four basketballs to create this look. In addition to four basketballs, you'll need an air pump and some household glue, such as Goop or E-6000. Deflate each ball about ¼ of the way. Place them over the bed posts. If they don't fit quite right, inflate or deflate until the size is right. Now take some of the household glue and secure the basketballs to the post. Be sure to leave the side with the air hole accessible in case air needs to be replaced at a later date. Allow the balls to dry on the posts 24 hours before disturbing them.
0 Comments
by Lyn Lomasi, Write W.A.V.E. Media Staff

"But mom, I need a couch, a desk, a bed, and a dresser all to fit into my room. Oh, and I also need a card table and a vanity." If this statement worries you, think about choosing versatile furniture for a kid's bedroom.
Choose flexible colors and patterns. Ever seen a child's room where the colors and patterns just don't mesh? Many times this is due to lack of planning. The parents may have picked out one pattern when the child was younger and blended several over the years. Choosing solid colors and neutral patterns can help prevent this. Does your child like a particular character or item? Choose furniture of those colors and keep the character or object pattern to the bedding and draperies. Those are easier and less expensive to switch out as your child grows. Solid colors make furniture more versatile, as it can be used for years to come as the child's tastes grow with him. Use transitional furniture. Another way to keep kids furniture versatile is by choosing pieces that can transform into stages as your child grows. For instance, choosing a convertible crib that changes from a crib, to a toddler bed, then a twin sized bed is a wiser purchase than a simple crib. Choose furniture that easily changes when your child's needs do. Choose multipurpose items. Rather than choosing items that have only one function, save space by choosing things that are good for more than one purpose. For instance, you might choose a bench that also doubles as a storage space. Another option is a futon or other seating area that also doubles as a bed. This helps save space in your child's room. But at the same time, it gives them all the items they would like to have. Choose items with multiple age levels. Rather than buying small items that will not grow with your child, choose those that are appropriate for all ages. For instance, one table and chair set may accommodate only preschoolers. Yet another may work for preschool age on up to teens. The second option is more versatile. It will last longer and also will come in handy when friends of relatives of varying ages come over for a play date. What are the benefits of choosing versatile furniture for a kids bedroom? Items that work for many uses and a variety of age levels are beneficial in many ways. These items, though sometimes pricey, can actually be a savings in the long run. This is because they will help prevent the purchase of other items in the future. These items often grow with the child, which means they don't have to give up their favorite items. Another great benefit to versatile items is that if your child decides he does not like a piece as he grows, it can be re-purposed for another family member or friend. Adding Curb Appeal is Fairly Simple
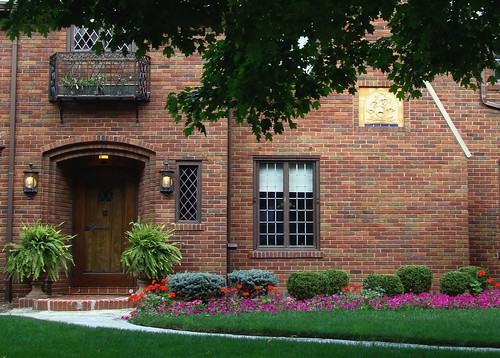
Adding curb appeal to your home doesn't have to be hard. It can actually be quite fun. Whether you're dressing it up for a showing, just want your home to look the way it makes you feel, or just want to show off to your friends and neighbors, there are many things you can do to add curb appeal to your front steps and landing.
Why Should I Worry About Curb Appeal? Curb appeal is important to a home for a variety of reasons. Your home should feel inviting to you. It should also be something you are proud of and should show your personality. Adding curb appeal could help you feel that before you even step foot in your door. If you are selling your home, curb appeal can help make sale. If a home is not attractive on the outside, buyers instantly get a bad impression before stepping foot in the door and may expect (and look for) the worst. Another reason for curb appeal is that you don't want your home to stand out as the eyesore of the neighborhood. Using Potted Trees Appropriately One simple way to add some curb appeal to your front steps and landing areas is to use potted trees. Potted trees can make attractive scenery and there are many styles to choose from. Try to choose trees that will do well in your climate, as well as accent the area. For instance, you don't want to put a tall palm tree in the middle of a small walkway in the dead of winter. Walkway Gardens For More Style Gardens can be created just about anywhere. A walkway garden is another way to create curb appeal. This can be done right into the ground. However, if there is already cement or stone in place that you'd rather not dig up, you may want to take another approach by using potted plants and other scenery along the border of the walkway. A raised bed garden also works great as a walkway garden. The container for one of these can be created with wood, stone, brick, or other materials. You can purchase these and other necessary materials, as well as the plants at the local home improvement center. Flowers and shrubbery both work well for raised bed gardens that will be along a walkway. The garden can be centered or created along the sides of the walkway, leading up to the landing. Placement should depend upon your individual taste, as well as your exterior layout and available space. Accenting Your Landing Decorative planters are another great way to accent your stairs and landing. They come in many sizes and a variety of plant choices can be used to match your scenery and effectively draw positive attention to your home. Garden centers and home improvement warehouses generally have a big selection of planters, as well as plants and flowers. Choosing containers with nontraditional shapes and placing them along the stairs is one way to add curb appeal with decorative planters. Another way could be to plant some flowers in a fountain or other non-traditional item that can be used as a planter. Decorative pedestals can also create curb appeal. Placing them at the landing of the stairs can create an elegant look, depending upon the layout of your home. Try painting the pedestals with textured or marbleized paints. Go for colors that blend in with the look of your home, as well as the outdoor scenery. Making a Splash With Water Features Another great way to add curb appeal is by using water features. Above, there was an example of using a fountain as a planter. That's one idea. Another could be to create a tropical or forest scene inside a water feature. Water is calming and soothing and can make you and your guests feel welcome before even setting foot inside. Set up this water feature on your landing, being sure to still leave room for accessing the stairs and the home. If your landing is small, water features can be created on walls as well. There are many ways to add curb appeal. It's all about adding accents to your existing features. Everyone has their own individual taste and style. No matter which options you choose, be sure it not only makes your home look attractive, but makes you feel at home as well. At the end of the day, it is still your home and the main curb appeal should be catered to your own preferences. 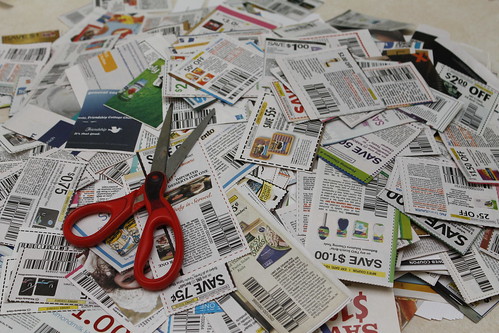
If you're a frugal shopper (or cheap) like me, then you need an equally frugal (or cheap) place to store your coupons. Follow along to learn how to make your own coupon organizer. Minimal sewing skills are required, but this simple project can even be done by sewing novices.
Materials for Making Your Own Coupon Organizer Zippered pencil pouches can easily be purchased for less than a dollar each if you go at the right time. You'll need about five zippered pouches. They should be around 4" x 9" and should not be the ones that include holes for three-ring binders. Dollar stores and back to school sales are a great place to find these. You'll also need a large hand sewing needle and embroidery floss in a color that matches your pouches. Since you'll be sewing, be sure you also have some scissors on hand. How to Make Your Own Coupon Organizer Easily Now that you've gathered all the materials for your simple coupon organizer, it's time to get started. Line up the pencil pouches evenly, making sure that the zippers are all facing the same way. Thread the needle with the embroidery floss. A quick tip to remember when threading the needles is to bring the thread to the needle, not the other way around. Now sew around the edges and bottoms. This should connect all of the zippered pouches together. The zippered sections, as well as the sections in between the zippers, can be used for organizing coupons. Adding Extra Features to the Simple Coupon Organizer If you want to label your homemade coupon organizer, it should be quite simple to stick adhesive labels to the upper inside of each section. Label the coupons in a way that you will be able to understand and get to fairly easily. Some suggested categories include dairy, cereal and breakfast foods, canned goods, breads, meats, cooking/baking, and snacks. For convenience, you may also want to make it so that your coupon organizer attaches to the handle of a grocery cart. To do this, purchase an extra zippered pouch. Cut the sides of that pouch. While sewing the pouches together, attach the cut pouch to the back side, leaving the cut half sticking up at the top. Attach a strip of velcro to the top edge of that piece. Determine where the other part of the velcro would need to go on the back to circle that flap around a shopping cart handle. Then, attach it to that area. That's it. Now you have an ultra-convenient and ultra simple coupon organizer. 
A fall garden party can be a great way to welcome and celebrate the fall season. The fall garden party activities below are a great way to keep your guests talking and leave them something to remember long after the party has ended.
Seed Swapping What's a fall garden party without planting seeds? Ask your guests to bring fall seeds to exchange with others. They can either buy seeds from the store, bring seeds they have but won't use, or cultivate some seeds from their own gardens to share. If there are loose fall seeds, place those in zippered sandwich bags to make it easier to distribute them. Once everyone has contributed their share, sort them in a way that makes it easy for everyone to choose which ones they'd like. Have a designated area to organize all the seedlings and also figure out how many packages each person will be able to have.You may wish to supply something fun for each person to collect their seeds with, such as a watering can or small pot or planter. DIY Container Planting Another fun garden party activity is DIY container planting. Your fellow gardening pals will enjoy this activity. It can be fun to garden together with friends. Tips can be shared and since guests at a fall garden party will likely be gardeners, most should be enjoying themselves. Supply gloves, a container, fall seedlings, soil, and a garden spade. You may also want to have guests use some of the seeds acquired during the seed swap. Allow guests to bring home whatever they have planted in their planters. This not only gives the guests something fun to do at the outdoor party, but it also gives them something they can use. Plus, each time they look at their fall plants, they can remember the great time spent with their friends. Buckets for the Homeless If you'd rather gear your fall party toward being charitable to others, instead of the DIY container planting, guests can create buckets for the homeless. Buckets for the homeless are actual container gardens using buckets. For these, you'll need a large bucket for each one to be made, soil, and vegetable seeds or sprouts. Buckets make great container gardens for the hungry or homeless because they can be easily carried around. They provide a continuous source of nutrition that they can bring anywhere without worrying about refrigeration. Be sure to plant a variety of vegetables. Usually for these, the tomato is planted in the middle, with other vegetables surrounding it. Place a cracked egg underneath the tomato plant for extra fertilizer. Also, be sure that holes are poked in the bottom and sides of the buckets for irrigation. |
LIfe & Home Journal

Archives
January 2024
Categories
All
|
- Brand Shamans
- Brand Healing
- Inner Healing
-
INTENT-SIVE NATURE
- Content & Brand Elevation
- Healing Jewelry & Talismans
- Bath, Beauty, & Self-Care
- Healing Sessions
- Rituals, Herbs, & Altar Supplies
- Gawwwdess Baby Boutique
- Soul Flame Gifts
- Yoga & Meditation
- Books & Media
- Education & Homeschool Resources
- Home, RV, & Decor
- Clothing
- Pets
- Custom Orders
- Monthly Subscription Boxes
- October Festivals
- Herbal Intent
- FLOW-Key Parenting
- About & Contact
- RV, Nature, & Travel Shamans
- Souls Within
- Life & Home
- Heart 'N Mind Homeschool
- The Homeschooling Mommy
- Books & Authors
- Speak Up!
- Pawsitive Pet Parenting
- Manifesterz
- Gifts In Minutes
 RSS Feed