
Looking to sell your home and maximize your profits? First, you need to raise the resale value, especially with cost-effective curb appeal. There are many ways to do so. Landscaping is said to have a 100 to 200 percent value of recovery at a sale. Other popular methods to raise resale value, such as kitchen and bath remodels, have smaller recovery rates. Some might argue that beautiful landscaping is costly, especially when going for curb appeal. Fortunately, there are cost-effective ways to get that desired curb appeal.
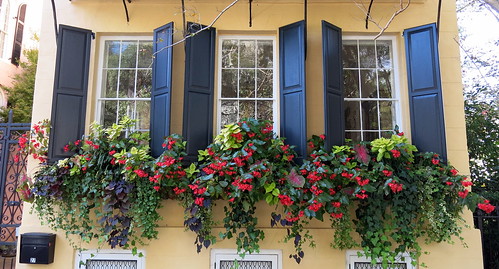
Patching up the Lawn Maintaining a nice lawn for curb appeal is often thought to be expensive, but there are ways around that. For instance, when you've got dry patches, instead of spending a ton of time and money on products to re-grow that patch, consider purchasing a square of grass from your local garden center or home improvement warehouse. This way, the grass already looks nice and all you have to do at that point is insert it into your lawn and maintain it like the other areas. Grass squares are generally inexpensive. A nice, green lawn is great curb appeal. Blooming Flowers Colorful flowers that go with the season add curb appeal by brightening up or drawing attention to the outside of a house. These flowers can be displayed in pots, a flower bed or a combination of both. Annuals often are very cost-effective, averaging under a couple dollars for six or more. These can be found at local garden centers, home improvement warehouses and big name retailers. Window Boxes Falling in line with the cost-effective flower idea, window boxes add great curb appeal. They are fairly inexpensive to make or buy, and planting colorful annuals inside them can be beautiful. This makes for a very simple and cost-effective curb appeal project. Potted Plants Potted plants are a great way to add cost-effective curb appeal to your landscaping or walkway. When dispersed around the landscaping and other areas, potted plants can make the outside of a home very appealing and inviting. Plain clay pots are generally the most cost-effective. To spruce them up, they can be painted with inexpensive outdoor spray paint or ceramic paint. Designs or plain colors can both work well, depending on your desired look. Pedestals A few strategically placed pedestals can also add cost-effective curb appeal to the landscaping of your home. These can be placed in the lawn, along the walkway or even at the front door. To add even more curb appeal, place a potted plant atop each pedestal.
0 Comments
Adding Curb Appeal is Fairly Simple
Adding curb appeal to your home doesn't have to be hard. It can actually be quite fun. Whether you're dressing it up for a showing, just want your home to look the way it makes you feel, or just want to show off to your friends and neighbors, there are many things you can do to add curb appeal to your front steps and landing.
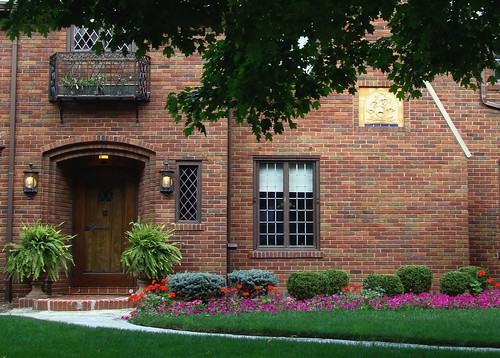
Why Should I Worry About Curb Appeal? Curb appeal is important to a home for a variety of reasons. Your home should feel inviting to you. It should also be something you are proud of and should show your personality. Adding curb appeal could help you feel that before you even step foot in your door. If you are selling your home, curb appeal can help make sale. If a home is not attractive on the outside, buyers instantly get a bad impression before stepping foot in the door and may expect (and look for) the worst. Another reason for curb appeal is that you don't want your home to stand out as the eyesore of the neighborhood. Using Potted Trees Appropriately One simple way to add some curb appeal to your front steps and landing areas is to use potted trees. Potted trees can make attractive scenery and there are many styles to choose from. Try to choose trees that will do well in your climate, as well as accent the area. For instance, you don't want to put a tall palm tree in the middle of a small walkway in the dead of winter. Walkway Gardens For More Style Gardens can be created just about anywhere. A walkway garden is another way to create curb appeal. This can be done right into the ground. However, if there is already cement or stone in place that you'd rather not dig up, you may want to take another approach by using potted plants and other scenery along the border of the walkway. A raised bed garden also works great as a walkway garden. The container for one of these can be created with wood, stone, brick, or other materials. You can purchase these and other necessary materials, as well as the plants at the local home improvement center. Flowers and shrubbery both work well for raised bed gardens that will be along a walkway. The garden can be centered or created along the sides of the walkway, leading up to the landing. Placement should depend upon your individual taste, as well as your exterior layout and available space. Accenting Your Landing Decorative planters are another great way to accent your stairs and landing. They come in many sizes and a variety of plant choices can be used to match your scenery and effectively draw positive attention to your home. Garden centers and home improvement warehouses generally have a big selection of planters, as well as plants and flowers. Choosing containers with nontraditional shapes and placing them along the stairs is one way to add curb appeal with decorative planters. Another way could be to plant some flowers in a fountain or other non-traditional item that can be used as a planter. Decorative pedestals can also create curb appeal. Placing them at the landing of the stairs can create an elegant look, depending upon the layout of your home. Try painting the pedestals with textured or marbleized paints. Go for colors that blend in with the look of your home, as well as the outdoor scenery. Making a Splash With Water Features Another great way to add curb appeal is by using water features. Above, there was an example of using a fountain as a planter. That's one idea. Another could be to create a tropical or forest scene inside a water feature. Water is calming and soothing and can make you and your guests feel welcome before even setting foot inside. Set up this water feature on your landing, being sure to still leave room for accessing the stairs and the home. If your landing is small, water features can be created on walls as well. There are many ways to add curb appeal. It's all about adding accents to your existing features. Everyone has their own individual taste and style. No matter which options you choose, be sure it not only makes your home look attractive, but makes you feel at home as well. At the end of the day, it is still your home and the main curb appeal should be catered to your own preferences. 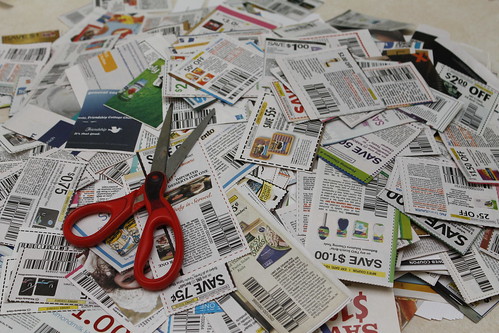
If you're a frugal shopper (or cheap) like me, then you need an equally frugal (or cheap) place to store your coupons. Follow along to learn how to make your own coupon organizer. Minimal sewing skills are required, but this simple project can even be done by sewing novices.
Materials for Making Your Own Coupon Organizer Zippered pencil pouches can easily be purchased for less than a dollar each if you go at the right time. You'll need about five zippered pouches. They should be around 4" x 9" and should not be the ones that include holes for three-ring binders. Dollar stores and back to school sales are a great place to find these. You'll also need a large hand sewing needle and embroidery floss in a color that matches your pouches. Since you'll be sewing, be sure you also have some scissors on hand. How to Make Your Own Coupon Organizer Easily Now that you've gathered all the materials for your simple coupon organizer, it's time to get started. Line up the pencil pouches evenly, making sure that the zippers are all facing the same way. Thread the needle with the embroidery floss. A quick tip to remember when threading the needles is to bring the thread to the needle, not the other way around. Now sew around the edges and bottoms. This should connect all of the zippered pouches together. The zippered sections, as well as the sections in between the zippers, can be used for organizing coupons. Adding Extra Features to the Simple Coupon Organizer If you want to label your homemade coupon organizer, it should be quite simple to stick adhesive labels to the upper inside of each section. Label the coupons in a way that you will be able to understand and get to fairly easily. Some suggested categories include dairy, cereal and breakfast foods, canned goods, breads, meats, cooking/baking, and snacks. For convenience, you may also want to make it so that your coupon organizer attaches to the handle of a grocery cart. To do this, purchase an extra zippered pouch. Cut the sides of that pouch. While sewing the pouches together, attach the cut pouch to the back side, leaving the cut half sticking up at the top. Attach a strip of velcro to the top edge of that piece. Determine where the other part of the velcro would need to go on the back to circle that flap around a shopping cart handle. Then, attach it to that area. That's it. Now you have an ultra-convenient and ultra simple coupon organizer. 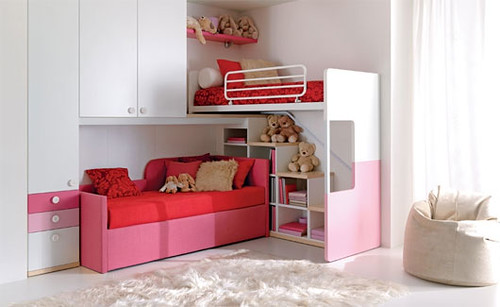
Creating a room to grow for your child has many benefits. Not only is it generally an economical approach, but it also can be fun, as well as simple. You don't have to be an expert to get the job done, just willing to dedicate a little bit of time and effort to the project.
One scenario is hypothetical child Trina, who is turning 10 in a week, but her room makes her feel like a toddler. That's because that was the last time she had a theme change for her room. There is heavy wallpaper that she no longer likes, babyish furniture, and pink, pink, pink everywhere. The furniture, the walls, the carpets - everything's pink! She used to like pink, but not so much anymore. Had her mom designed her a room to grow, the task ahead of them would not be so difficult. Follow the tips below to help prevent something similar from happening with your child. Choosing Colors and Theme The first step to designing a child's room to grow is deciding what colors and theme to use. Choosing solid colors that go with the theme you have in mind can make for an easier transition as a child gets older. By choosing neutral solid colors, themes can be switched around more easily. For instance, if your child wants a dinosaur theme, you can use primary colors. If that same child later wants a sports theme, the primary colors can still be used. Only the decorations, and possibly the bedding, will need to be switched. If your child wants something wild, like stripes, on the walls, try using fabric or removable wall stickers to create that look rather than painting. This way, if your child changes his or her mind later, it will not be difficult to remove the look and add another. Beds There are so many different bed options, it's often hard to choose. Did you know that there are even beds that start out as cribs, convert to toddler beds, all the way up to a queen or king size? These convertible crib beds offer plenty of room to grow. Most come with everything you need, except the mattresses. Some of these transitional beds can hit the wallet hard, but if you add up the costs of purchasing each bed separately, a transitional bed is usually a money saver. There are many options for these types of beds, and they are not all outrageously priced. Be sure to shop around. If you cannot afford the option that gives you every bed size, try opting for a crib that converts at least to a daybed or toddler bed. Some of these options are comparable in price to many cribs. Convertible Changing Area Using a traditional student desk as a changing table can save you some money and make for an easy way to ensure this piece of furniture has room to grow. At the diapering stage, purchase a traditional student desk with a drawer. Also purchase a thick, strap-on changing table pad. Safely secure it to the desk. There are also inexpensive diapering supply racks that can be attached to the sides of a changing table. Many also will attach to a desk. One of those will hold all the items you'll need, and what won't fit there can go into the desk drawer. When your child gets too big for a changing area, simply detach the diapering rack and changing pad and purchase a chair. Your toddler or preschooler now has a desk area that will last as he or she grows. As your child gets older, you may also wish to add a hutch atop the desk for extra storage or a new look. Another idea is to purchase a changing table dresser. With these, the changing area comes off later when you no longer need it. You can use this type of dresser from babyhood throughout childhood, as the styles and colors are generally neutral. Furniture Accents A lamp is a useful item for the dresser top that can grow with a child. If the base is a solid color and decorations are added to the lampshade, the lampshade can be traded out as the child grows and changes styles and patterns in the room. Lampshades are fairly inexpensive, as are many things that can be used to decorate them, such as ribbon, plastic cars and sequins. As for the dresser itself, choosing a roomy and unfinished design can help to ensure that a child will not outgrow it. To add style, instead of painting the dresser, try accenting it with decorative knobs or handles. These are easily replaceable and many are a very reasonable price at home improvement stores. As with the dresser, keep it simple with other furniture. Try decorating the accents instead of the item and dressing it up with items that can easily be added or taken away as desired. Using decorative fabrics is a great way to dress up bed posts, dresser tops, desktops, the back of a comfy chair, and just about any piece of furniture. Window Treatments and Bedding This is an area where many people have trouble deciding what to use. If you go for flashy designs that match your child's theme, it will certainly look good, but it may not allow much room to grow. Instead, go for a more simple approach. Feel free to blend colors, but be sure each piece is one solid color. For instance, in a dinosaur-themed room with primary colors, one pillowcase could be blue, while another may be red. Another example is having one white drapery panel, one silver panel and one gold panel in a room with an angel theme. Mixing two or three colors is a great way to accent the theme while still leaving room to grow. Later, the colors can be switched around, taken away, or added to, creating a simple option for creating room to grow. 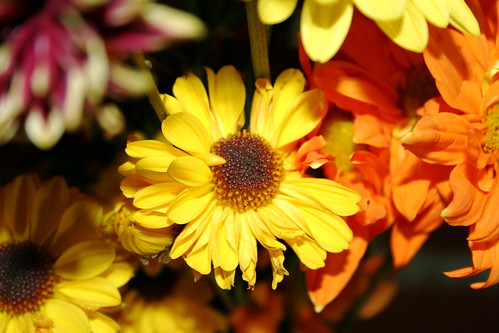
Pumpkins, scarecrows, black cats, and cornucopias...what do all those symbolize? Fall. But, not early fall. All of those are for later on in the season. Fresh fall flowers are a great item to decorate an early fall party table with, as they're so versatile. Here are several ideas.
Which Fall Flowers Should I Choose? Some favorite fall flowers include marigolds, chrysanthemums, hydrangeas, and fall roses. Annuals can also make great fall flowers, if they are the right colors. Fall colors are generally shades of red, gold, brown, green, and yellow. Decorating Containers For Fresh Fall Flowers One way to decorate with fall flowers is to add a vase of freshly cut fall flowers to the table in a fall-themed container. If you opt for a more plain container, but want to dress it up, try gluing a strip of fall-colored ribbon around the rim and base. To finish it off, place some grapes around the base of the container. Using Fall Flower Heads For Decor Another way to use fall flowers as early fall party decorations is to use just the heads of the flowers. One way to do this is to place a container of water on the table and allow the fall flower heads to float atop the water. For more accent, add floating candles and maybe some pine-cones or acorns as well. Fall flower heads can also be sprinkled around the table. Creating Fall Flower Wreaths Fall flowers, pine-cones, and acorns can be used together to create fresh fall table wreaths. Simply intertwine the flower stems with one another to create the rings. Then, add the pine cones and acorns using ribbon. The ribbon will also be a part of the wreath table decorations. To use these wreaths, place decorative containers or candles in the center of them. Small table wreaths can also be made to encircle the glasses of the guests. Fall Flower Garlands For The Table Another fall table decoration could be a garland. The goal is to create a long string of flowers, pine-cones, and acorns. The strand should be long enough that when made into a circle (or applicable table shape), it fits exactly around your table. This is done in the same manner as the wreaths above. Creating fall party table decorations from fresh flowers can be a fun activity and as you can see from above, it is fairly simple, with easy to obtain supplies. |
LIfe & Home Journal

Archives
January 2024
Categories
All
|
- Brand Shamans
- Brand Healing
- Inner Healing
-
INTENT-SIVE NATURE
- Content & Brand Elevation
- Healing Jewelry & Talismans
- Bath, Beauty, & Self-Care
- Healing Sessions
- Rituals, Herbs, & Altar Supplies
- Gawwwdess Baby Boutique
- Soul Flame Gifts
- Yoga & Meditation
- Books & Media
- Education & Homeschool Resources
- Home, RV, & Decor
- Clothing
- Pets
- Custom Orders
- Monthly Subscription Boxes
- October Festivals
- Herbal Intent
- FLOW-Key Parenting
- About & Contact
- RV, Nature, & Travel Shamans
- Souls Within
- Life & Home
- Heart 'N Mind Homeschool
- The Homeschooling Mommy
- Books & Authors
- Speak Up!
- Pawsitive Pet Parenting
- Manifesterz
- Gifts In Minutes
 RSS Feed